
Indoor Greenhouse Craft
Materials you will need:
1 Two liter bottle
1 small plastic soda bottle
1 small plastic plate
1 permanent black marker
1/2 yard of coordinating ribbon
Ultimate Craft Titanium Snip
Border Punch - Apron Lace
Paper Crimper
Floral Portable Glue Gun
Craft Hand Drill - Green
Craft 12" Portable 28mm Rotary Trimmer
Circle Cutter
18" x 24"Cutting Mat
High Density Ink Pad - Light Blue
Tape Runner
Cloud 9 Designs
Alyssa's Garden line paper
How to make Indoor Greenhouse Craft:
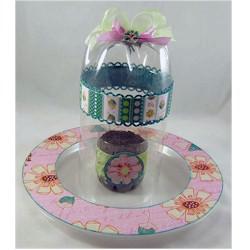
1. Begin by cutting our 2 liter bottle to size. My bottle measures about 12" and I want to cut about 4" off the end with the neck. That will leave me about 8" as my greenhouse. To do this I made marks with permanent marker by measuring down 8" from the top and about every 2 inches around the outside of the bottle. This will be my guide as I cut around the bottle. The best tool for this job is the Fiskars Titanium Nitride Ultimate Craft Scissors. With the craft scissors locked in the closed position I pierced a hole hear the neck of the bottle as a starting point for my cutting. You may want to do this step depending on the age and abilities of your child. Then I simply opened the safety lock and cut down towards my marked guide and cut all the way around.
2. Cut two pieces of solid blue cardstock measuring 2"x12" using your Fiskars 12" portable rotary trimmer. I wasn't able to get the 12" strip to fit all the way around the 2 liter bottle so I needed to add a bit more which is why you will need 2 strips. Once you have your strips cut then go along the long edges with your Fiskars Apron Lace border punch. Piece the strips together to the length that you need and then run the entire strip through your Fiskars Paper Crimper.
3. Using your Fiskars Easy Squeeze Glue gun apply adhesive and attach the crimped strip to the upper portion of your 2 liter bottle.
4. Cut two strips of Garden Stripe patterned cardstock measuring 1"x12". You will mount this on top of the border punched and crimped strip, so again measure and adjust your two strips to fit around your bottle on top of this strip.
5. Next take your small soda bottle and cut it down the same way you did the large one so it is about 3" tall. Using your Fiskars Craft Drill create a small hole in the bottom of this cup for drainage.
6. Cut a 1 1/2" x 12" strip of Luster Meadow blooms using your Fiskars 12" portable rotary trimmer. Adjust the length to fit and then fasten it around the small cup using the Fiskars Easy Squeeze Glue Gun.
7. Punch a circle using your XL Round n' Round Squeeze punch from the blue patterned cardstock. Place one of the Alyssa's garden dimensional stickers in the center and place this circular piece on green strip you already attached to your cup.
8. Using your Fiskars Circle cutter, 18"x24" mat and a sheet of Quilted Flowers patterned cardstock cut a circle large enough to fit the outside diameter of your plate. Mine was 10". Once you have that cut, then you will want to cut a circle out of the center large enough so your 2 liter bottle will easily fit inside. I cut a 7" circle out of the inside of mine.
9. Next ink around the inside and outside edges of your circle using your Fiskars Why So Blue ink pad. Attach the ring to the outside edge of your plate again using your fiskars Glue gun.
10. Use your Fiskars Craft drill to create 2 small holes in the top of your 2 liter bottle. You will drill the first one 1/4" out from the center and then follow that straight across to the other side and drill another on that side 1/4" from center. You will use these holes to create a bow on top of your greenhouse. This will add a decorative touch as well and providing a handle to pick up your greenhouse cover. Thread your ribbon up, one end through each hole and tie a bow. I used two different colors of ribbon for mine.
11. To finish off the ribbon pieces I attached a dimensional flower to the center.
Popular Diy crafts catogeries
- Christmas crafts
- Halloween crafts
- Thanksgiving crafts
- Easter crafts
- Mother's day crafts
- Winter Crafts
- Summer Crafts
- Father's day crafts
- Spring crafts
- Valentine's day crafts
- Turkey crafts
- Pumpkin crafts
- Autumn crafts
- Space crafts
- Owl crafts
- 4th of July crafts
- Nature crafts
- Farm animal crafts
- Penguin crafts