
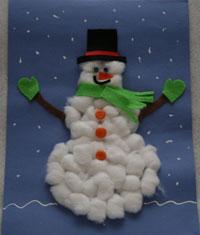
Cotton Ball Snowman Craft
Materials you will need:
Blue construction paper or card stock
Cotton balls
Glue
Scissors
1 brown pipe cleaner
Green, black and orange felt
2 googly eyes
3 buttons
White 3-D paint
How to make Cotton Ball Snowman Craft:
1. Use the glue to "draw" three circles on the blue construction paper as an outline of your snowman. Fill the circles in with glue.
2. Stick cotton balls in the glue circles to form your snowman.
3. Cut a pipe cleaner in half and glue them on either side of the middle circle.
4. Cut a pair of gloves out of the green felt for the snowman's mittens and glue over the pipe cleaners.
5. Cut a longer and shorter rectangle out of green felt. Glue the longer rectangle over the "neck" of the snowman. Glue the shorter rectangle over the longer one at a slight angle so that it looks like the scarf has been wrapped around the snowman. Cut slits in the ends of the green rectangles.
6. Glue two eyes onto the snowman.
7. Cut a small triangle out of orange felt and glue into place under the eyes.
8. Cut a "C" shape out of black felt and glue into place under the nose as the snowman's mouth.
9. Cut a hat out of black felt and glue to the top of the snowman's head. Add a strip of red ribbon in the middle of the hat.
10. Glue on 3 buttons.
11. Use white 3-D paint to add dots of snow to the background of your picture.
Popular Diy crafts catogeries
- Christmas crafts
- Halloween crafts
- Thanksgiving crafts
- Easter crafts
- Mother's day crafts
- Winter Crafts
- Summer Crafts
- Father's day crafts
- Spring crafts
- Valentine's day crafts
- Turkey crafts
- Pumpkin crafts
- Autumn crafts
- Space crafts
- Owl crafts
- 4th of July crafts
- Nature crafts
- Farm animal crafts
- Penguin crafts