
Paper Plate Clock Craft
Materials you will need:
Round paper plate
Felt pens
Coloured cardboard
Felt tip pen
Split pin
Scissors
How to make Paper Plate Clock Craft:
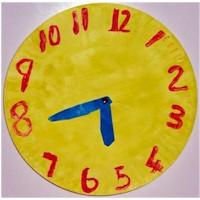
1. Paint the paper plate and leave it to dry (or colour it with afelt tip pen).
2. Cut two pieces of coloured cardboard for the hands, making one smaller than the other (for the hour and minute hands).
3. Using a coloured felt pen which blends in well with the clock face colouring, write in the numbers. It may assist you when numbering the clock, to separate it into four quarters with a pencil which can then be removed with an eraser. However, you need to exercise caution to ensure that this does not remove any paint.
4. Using the split pin, make a small hole in the centre of the plate (clock face). Be careful not to push it in too hard to avoid splitting the plate or bending the pin. Make a small hole through each of the hands and insert the pin through the hands and through the hole in the centre of the plate. Once the pin has been inserted, bend the prongs facing outwards so that it is fastened (you can also use a piece of masking tape on the back to secure it well). This enables the hands to move freely.
5. You're done and you have a beautiful clock of your own creation and your children are now ready to learn how to tell the time with their new clock.
Popular Diy crafts catogeries
- Christmas crafts
- Halloween crafts
- Thanksgiving crafts
- Easter crafts
- Mother's day crafts
- Winter Crafts
- Summer Crafts
- Father's day crafts
- Spring crafts
- Valentine's day crafts
- Turkey crafts
- Pumpkin crafts
- Autumn crafts
- Space crafts
- Owl crafts
- 4th of July crafts
- Nature crafts
- Farm animal crafts
- Penguin crafts