
Paper Pumpkins Craft
Materials you will need:
Scissors
12" square paper, 4 orange
Permanent marker, green
Personal paper cutter
12" square paper, green
Pencil
Hole punch, large
12" square paper, brown
Pipe cleaners, 9 green
How to make Paper Pumpkins Craft:
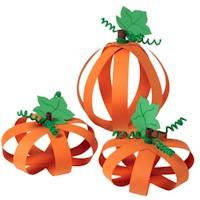
1. Cut orange paper into 1-1/2" wide strips, using paper cutter.
2. Arrange seven strips in an asterisk shape with ends slightly overlapping in center, making sure they are even width apart. Apply Tacky Spray on one end at time and press together. Let dry.
3. Pull up other ends to middle. Apply Tacky Spray on ends and place together. Let dry.
4. Click on Printables and print out leaf pattern on green paper. Cut out with scissors.
5. Use green marker to draw veins.
6. Punch a hole at center bottom of leaf. Place a pipe cleaner through hole and twist end around pipe cleaner.
7. Curl end of pipe cleaner around pencil. Remove pencil, leaving a curly-q. Repeat with other pipe cleaners, using three per pumpkin.
8. Cut a 1" wide strip of brown paper and roll on pencil. Apply Tacky Spray on end of roll to adhere.
9. Spray one end with glue and press on top of pumpkin. Refer to photo.
10. Wrap pipe cleaners and leaf around stem. Repeat all steps to make other pumpkins.
11. For the larger pumpkin we recommend propping up in the center with the dowel or straw, cut to size. These pumpkin can be steadied by gluing a small piece of chipboard to the underside.
Popular Diy crafts catogeries
- Christmas crafts
- Halloween crafts
- Thanksgiving crafts
- Easter crafts
- Mother's day crafts
- Winter Crafts
- Summer Crafts
- Father's day crafts
- Spring crafts
- Valentine's day crafts
- Turkey crafts
- Pumpkin crafts
- Autumn crafts
- Space crafts
- Owl crafts
- 4th of July crafts
- Nature crafts
- Farm animal crafts
- Penguin crafts