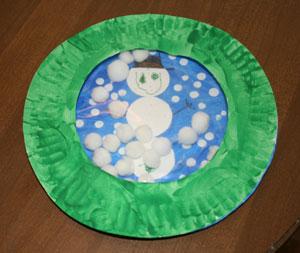
Paper Plate Snow Globe Craft
Materials you will need:
Two paper plates
Paint
Paint brushes
Markers, crayons, stickers, etc.
White pom-poms
Glue
Scissors
Scotch tape
Large Ziploc bag
Staples or Glue-dots
How to make Paper Plate Snow Globe Craft:
1.Cut the center circle out of a paper plate. Let your child paint the underside of the paper plate (ie: the non-food side) any color they would like.
2.Have your child paint a second paper plate any color they would like (paint the ˇ°food sideˇ± of this plate). We went with blue so it would look like a sky.
3.Once the full paper plate is dry have your child put together a winter scene in the center of the plate. Remember you won't really see the edges of the plate, so encourage them to stay in the middle. We made a snowman out of the paper plate cut out from step one and dotted on white paint with the handle of the paintbrush for snow.
4.While the winter scene dries, cut the edges off of a Ziploc bag. What you want is the back piece of the bag (the part with no writing on it). This will be the window of your snow globe. (note: we originally tried saran wrap but found that it was too frustrating for both the preschooler and for the adults! The Ziploc bag doesn't curl and stays where you put it.)
5.Cut the Ziploc bag to fit the circle and use scotch tape to secure it to the non-painted side of the plate with the hole in the center.
6.Once the winter scene on the intact paper plate is dry, lay your pom-poms on top of the plate.
7.Using either glue dots (we love these!) or staples attach the top plate to the bottom plate to complete your snow globe.
Popular Diy crafts catogeries
- Christmas crafts
- Halloween crafts
- Thanksgiving crafts
- Easter crafts
- Mother's day crafts
- Winter Crafts
- Summer Crafts
- Father's day crafts
- Spring crafts
- Valentine's day crafts
- Turkey crafts
- Pumpkin crafts
- Autumn crafts
- Space crafts
- Owl crafts
- 4th of July crafts
- Nature crafts
- Farm animal crafts
- Penguin crafts